
Virtual Private Network (VPN)
จากตอนที่แล้วผู้เขียนต้องการใช้ mobile phone จากที่ไหนก้อได้ที่มี internet เพื่อ remote เข้ามาทำงานบน linux pc ที่ออฟฟิส หรือ ที่บ้าน ซึ่งการจะทำแบบนี้ได้ด้วยความปลอดภัยจากการถูกแฮกข้อมูล จำเป็นต้องทำ virtual private network (VPN) ผู้เขียนได้ไปศึกษาหาข้อมูลเพื่อมาแนะนำ ในตอนนี้แล้ว
ผู้ให้บริการ vpn ส่วนใหญ่จะให้บริการฟรีสำหรับการเชื่อมต่อ 2 หรือ 3 หากต้องการมากกว่านั้นก้อจะเสียค่าบริการเป็นรายเดือน รายปี มาก น้อย ขึ้นกับบริการของแต่ละเจ้า ส่วนผู้เขียนเลือก openvpn cloud เพราะให้เชื่อมต่อฟรีได้ถึง 3 connectors No time limit และเป็น open source
หน้า wep page ของ openvpn
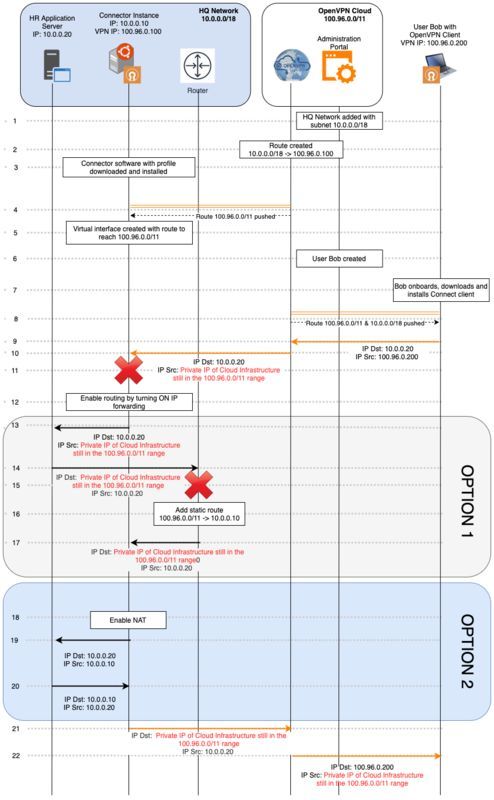
รูป private network ที่ออกแบบไว้
ขั้นตอนโดยสรุป
1. ไปลงทะเบียนขอใช้ vpn cloud ฟรี ที่ openvpn.net
2. set up ตาม step ที่ app แนะนำ
3. download connector สำหรับ mobile หรือ pc
4. สำหรับ mobile phone ให้ติดตั้งแอป openvpn และ run โปรแกรม เลือก profile ที่ download ตามข้อ 3
สำหรับ linux จะยุ่งยากหน่อย set up ตามนี้
$ mkdir openvpn
$ cd openvpn
เนื่องจาก ผู้เขียนใช้ linuxmint-20.3 จำเป็นต้องแก้สคิปไฟล์ บรรทัดที่มีข้อความ DISTRO=$(lsb_release -c | awk '{print $2}') เป็น DISTRO='focal'
$ nano ./ubuntu_20_04.sh
#!/bin/bash
# Install dependencies
sudo apt update
sudo apt install gpg curl
# Install the OpenVPN repository key used by the OpenVPN packages
curl -fsSL https://swupdate.openvpn.net/repos/openvpn-repo-pkg-key.pub | gpg --d
earmor | sudo tee /etc/apt/trusted.gpg.d/openvpn-repo-pkg-keyring.gpg > /dev/nul
l
# Add the OpenVPN repository #my linuxmint-20.3 ==> ubuntu focal
DISTRO='focal'
sudo curl -fsSL https://swupdate.openvpn.net/community/openvpn3/repos/openvpn3-$DISTRO.list -o /etc/apt/sources.list.d/openvpn3.list
sudo apt update
# Install OpenVPN Connector setup tool
sudo apt install python3-openvpn-connector-setup
# Enable IP forwarding
sudo sed -i 's/#net.ipv4.ip_forward=1/net.ipv4.ip_forward=1/g' /etc/sysctl.conf
sudo sed -i 's/#net.ipv6.conf.all.forwarding=1/net.ipv6.conf.all.forwarding=1/g' /etc/sysctl.conf
sudo sysctl -p
# Configure NAT
IF=$(ip route | grep default | awk '{print $5}')
sudo iptables -t nat -A POSTROUTING -o $IF -j MASQUERADE
sudo ip6tables -t nat -A POSTROUTING -o $IF -j MASQUERADE
sudo DEBIAN_FRONTEND=noninteractive apt install -y iptables-persistent
# Run openvpn-connector-setup to install ovpn profile and connect to VPN.
# You will be asked to enter setup token. You can get setup token from Linux
# Connector configuration page in OpenVPN Cloud Portal
sudo openvpn-connector-setup
เมื่อแก้ไขเสร็จแล้วให้ run script
$ ./ubuntu_20_04.sh
$ sudo openvpn-connector-setup
OpenVPN Cloud Connector Setup
This utility is used to configure this host as an OpenVPN Cloud Connector.
Before this utility can be run, you must have configured a connector in
the OpenVPN Cloud web portal where an setup token is provided. This
token is used by this utility to download the proper VPN configuration
profile and complete the configuration.
Enter setup token: ให้ copy generate token จาก wpc มาวาง
Downloading OpenVPN Cloud Connector profile ... Done
Importing VPN configuration profile "OpenVPNCloud" ... Done
Enabling openvpn3-session@OpenVPNCloud.service during boot ... Done
Starting openvpn3-session@OpenVPNCloud.service ... Done
ถึงตอนนี้ linux pc ตัวนี้จะต่อเชื่อมกับ wpc ด้วย tunnel interface เรียบร้อยแล้ว verify โดยใช้คำสั่งนี้
$ ifconfig
stat ของ mobile phone เมื่อเชื่อมต่อกับ wpc แล้ว
dash board ที่ wpc หน้าแอดมิน จะแสดงข้อมูลอุปกรณ์ที่เชื่อมต่อ และข้อมูลการใช้งาน
ตอนนี้ผู้เขียนสามารถใช้ remote desktop หรือบริการอื่น ผ่าน mobile phone ได้อย่างปลอดภัยไม่ว่าจะใช้งานผ่าน wifi โรงแรม สนามบิน ร้านกาแฟ public wifi
client smart phone อยู่ต่างโครงข่าย ร้องขอบริการ ssh server ก่อนและหลัง การเชื่อมต่อไปยัง wpc
ผู้อ่านสามารถหาข้อมูลเพิ่มเติมได้ที่
ขอบคุณที่ติดตามอ่าน....
- 7
โฆษณา
- ดาวน์โหลดแอปพลิเคชัน
- © 2025 Blockdit